select @@SERVERNAME servername,create_date 'InstallationDate' from sys.server_principals
where sid = 0x010100000000000512000000
select @@SERVERNAME servername,create_date 'InstallationDate' from sys.server_principals
where sid = 0x010100000000000512000000
LOG SHIPPING
· Restoring data from backups takes more time i.e., application down time is more. So to reduce this down time Microsoft had developed new features. They are a) Log Shipping, b) Database Mirroring and c) Clustering.
· Based on the database criticality we go for these features. In Log Shipping, down time is minimal.
· Log Shipping is a high availability feature where data is sent from one server to another server through T-log file backups. This feature is available from SQL Server 2000 onwards.
· The server which is configured for log shipping is called Primary Server and the database is called Primary Database. The server which receives data is called Secondary Server or Stand-by Server, and the database is called Secondary Database or Stand-by Database.
· The secondary database will be either in restoration mode or stand-by mode.
· This technique is useful for database availability by maintaining the second warm database that fill in certain intervals.
· Whenever the Primary Server gets unavailable, then Secondary server can be used as Primary server to get the database online.
· There will be some downtime to change the roles of the server at fail-over.
· In Log shipping 3 jobs to be done. They are a) Back-up job b) Copy job and c) Restore job
· Back-up job is performed at Primary Server. Copy and Restore jobs are performed at Secondary Server.
How Log Shipping works?
· Take Full backup and t-log backup of the primary database is copied to the stand-by server.
· Restore the backup into Stand-by database as either in read-only or no-recovery mode.
· When Stand-by database is in read-only mode then we can even only access the data but cannot modify it. Whereas in no-recovery mode we cannot even access the data.
· Log shipping is done only when the Primary database is either in Full or Bulk-logged recovery mode.
· When performing log shipping to a server in stand-by mode a TUF (Transaction Undo File) file is created. This file contains information on all the modifications performed at the time backup is taken. This file is very important in stand-by mode because when restoring the log, uncommitted transactions will be stored in this TUF file and the committed transaction log will be restored in stand-by database making the database available to read-only. When the next restoration is done this uncommitted transaction in TUF file checks with the T-log backup whether the transactions are committed or not. If they are committed they will be written to disk, else they are stored in TUF file until it gets committed or rolled back.
· Backup job runs on Primary database and the default scheduling time is 15 minutes.
· Copy job copies the backup files to the Stand-by server, this job runs on Stand-by server and the default scheduling time is 15 minutes.
· Restore job restores the copied files into the Stand-by database, this job runs on Stand-by server and the default scheduling time is 15 minutes.
Pre-requisites:
· The Primary database must be either in Full or bulk-logged recovery model.
· There is no naming convention for the log shipping database.
· Log Shipping is a Manual fail-over. Automatic fail-over is not there in Log shipping.
· Log shipping information stored in MSDB.
· Here we may configure one more server called Monitor server, which monitors the primary server and secondary server.
· Minimum down time is required.
CONFIGURING LOG SHIPPING
Let’s our database is “test” in “WINDC” server.

Right click on the database for which we are going to configure log shipping and select tasksà Ship Transaction Logs

Select “Enable this as a primary database in a log shipping configuration” option.

Click on “Backup Setting” for setting for backup process. Here we have to provide the network path and the local path of the backup folder and click on “Schedule” for scheduling the backup time interval.

By default, the schedule is for every 15 minutes. For our example we are reducing it to 5 minutes.

Click ok.

Click “Add” to configure the secondary server.

Click “connect” to connect to the secondary server and to the secondary database.

Provide the name for the secondary database.

Under “copy files” tab we provide the information where the files are copied, usually this folder will be on secondary server location. So here we provide the network path and click on “Schedule” for scheduling the copy job.

By default, it will be for 15 minutes, for our convenience it is reduced to 5 minutes.

Under “Restore Transaction Log” tab we provide the state of the secondary server, when the alert to be raised if restore does not occur, and schedule of the restore.

By default the schedule for restore is for 15 minutes, for our convenience it is reduced for 5 minutes.

Click ok.

Check on for Monitor server instance for configuring a monitor server and click on settings.

Click on Connect and connect to the monitor server and click ok.

Click ok.

Save Log Shipping Configuration window appears and here if any error occur we have to fix them. Click on close.

In “Primary server” “Job Activity Monitor” we can observe the job success (backup taken success)

ERRORS
Scenario: accidentally, if the user had deleted the jobs and databases in both Primary server and Secondary Server. The user have created another database and configured log shipping then the alert job will be failed and it still points to the previous log shipping database even though it is not present. (It is not recommended process to delete the jobs and databases without breaking log shipping)

Using primary_id, we have to delete the table in primary server.

First we deleted the data from “log_shipping_monitor_primary” using “primary_id”.

Now we have deleted the data from “log_shipping_monitor_secondary” using “secondary_id”

In secondary server, when we check “log_shipping_monitor_secondary” still alert is working.

We have deleted the old data from the table “log_shipping_monitor_secondary” using “secondary_id”

Now we can see the Transaction log shipping status working fine.

If Log Shipping is out of synch or LSN of the log files are disturbed?
If log shipping is out of synch then we have to take
STEPS TO APPLY A SERVICE PACK OR PATCH TO MIRRORED SQL SERVER DATABASES
Solution
In this tip, I am going to outline my environment and then walk through the process of patching mirrored servers.
My test environment consists of two SQL Server 2005 SP2 servers named SSQL1 (principal) and SSQL2 (mirror) that contain eleven mirrored databases. The database mirroring operating mode is set to asynchronous and I’m upgrading to SP4.
Here is a look at the two mirrored instances.

Step 1
Always backup all system and user databases before applying patches.
Step 2
Remote Desktop into the "Mirror" server (SSQL2 in our example) and download/copy the patch to the server.
Step 3
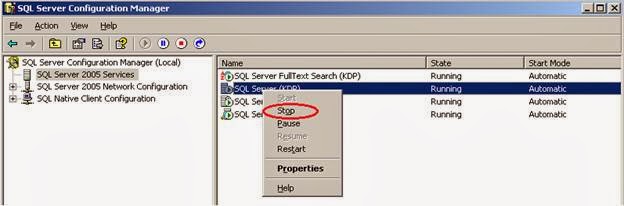
Stop all SQL Services on the "Mirror" server.
Step 4
Run the patch on the "Mirror" server.
Step 5
Once the patch is complete, reboot the "Mirror" server.
Step 6 (optional)
If your database mirroring is set to asynchronous (High Performance mode), we will need to synchronize the databases first. To do this we will need to issue the following statement for every database on the "Principal" server that is mirrored.
ALTER DATABASE< databasename> SET SAFETY FULL
Here are the commands for the 11 databases on my server.

Step 7
The databases might change to “synchronizing” while the transactions catch up. Once all of the databases show “synchronized”, as shown below, we can perform the manual failover.

We can perform the failover using the following statement on the principal server for each database:
ALTER DATABASE databasename SET PARTNER FAILOVER
Here are the commands for the 11 databases on my server.

We can now see that the servers have switched roles.

Step 8 (optional)
Once the failover has taken place and all the databases have switched roles we can set the operating mode back to asynchronous using the following statement on the new principal server:
ALTER DATABASE databasename SET SAFETY OFF
Here are the commands for the 11 databases on my server.

Patch the New Mirror Server
Now that the roles have been swapped, we will patch our "new" mirror server (SSQL1 in our example).
Step 9
Remote Desktop into the “new” "Mirror" server (SSQL1 in our example) and download/copy the patch to the server.
Step 10
Stop all SQL Services.
Step 11
Run the patch on the server.
Step 12
Once the patch is complete, reboot the server (SSQL1).
Step 13
Upon reboot and login, make sure all databases come online clean and synchronized.
Step 14
You now have two choices, leave the databases alone and leave SSQL2 as the principal and SSQL1 as the mirror or you can fail back to return the environment back to how it was from the beginning.
Step 15 (optional)
If you want to failback again follow these steps.
If you are using asynchronous mode issue this statement for each database:
ALTER DATABASE databasename SET SAFETY FULL
Once the databases are synchronized then run this statement for each database:
ALTER DATABASE databasename SET PARTNER FAILOVER
If you need to turn the asynchronous mode on again run this statement for each database:
ALTER DATABASE databasename SET SAFETY OFF
Here is an example of the commands to run on both servers.

Next Steps
TO ADD OR REMOVE NODES IN A SQL SERVER 2005 FAILOVER CLUSTER
On the Welcome page, click Next. The System Configuration Checker scans your computer's existing configuration.
To create a one-node failover cluster, only the node that will be installed with the failover cluster should be listed in the Required Node list.
Click Next.
If you are instructed to restart the computer, do so now. It is important to follow instructions from the Setup program after installation is complete. Failure to restart any of the specified nodes may cause failures when you run the Setup program again.
MOVING SYSTEM DATABASES FROM ONE LOCATION TO ANOTHER LOCATION
MOVING MASTER DATABASE:-
StartàAll ProgramsàMicrosoft SQL ServeràConfiguration toolsàSQL Server Configuration Manager

Here select SQL Server Services, right click on SQL Server instance and select Properties.

In Properties go to Advanced.

In Startup Parameters select the content and copy that to a notepad as shown below:

Here data file is in “C:\SQL Server\MSSQL.1\MSSQL\DATA” and the log file is in “C:\SQL Server\MSSQL.1\MSSQL\DATA”

Make the changes in notepad where we want to store the data and log file of master.

Copy the changed paths to the startup Parameters. Click Apply button.

Below shown message will be displayed. Click Ok on warning as shown below. Click Ok on Properties window.

Stop the SQL Server instance.
Change the location of the master.mdf and mastlog.ldf files to the specified locations and start the server.

Open Microsoft SQL Server Management Studio, open new Query and try the statements shown below:
USE master
go
select * from sys.sysfiles
go

Here you can see the file path, which is changed as shown in above screen.
MOVING MODEL DATABASE:
In the below shown screen shot we can see the logical name for the model and the file path where it is stored.

With the help of alter command shown below we can change the path of the model database.
use model
go
ALTER DATABASE model MODIFY FILE
(NAME='modeldev', FILENAME='C:\Data\Model_data\model.mdf')
go
ALTER DATABASE model MODIFY FILE
(NAME ='modellog', FILENAME='C:\Log\Model_log\modellog.ldf')
go

Note: “The file "modeldev" has been modified in the system catalog. The new path will be used the next time the database is started.” This message will be displayed after execution of the above mentioned statement.
Now we have to stop the SQL Server instance.
StartàAll ProgramsàMicrosoft SQL ServeràConfiguration toolsàSQL Server Configuration Manager

Change the location of the “model.mdf” and “modellog.ldf” files to the specified locations and start the server.

Open Microsoft SQL Server Management Studio, open new Query and try the statements shown below:
USE model
go
select * from sys.sysfiles
go

Here you can see the file path, which is changed as shown in above screen.
MOVING TEMPDB DATABASE:
In the below shown screen shot we can see the logical name of the tempdb and the file path where it is stored.

Use the below mentioned command to change the default path for the tempdb.mdf and templog.ldf files.
use tempdb
go
ALTER DATABASE tempdb MODIFY FILE
(NAME='tempdev', FILENAME='C:\Data\Tempdb_data\tempdb.mdf')
go
ALTER DATABASE tempdb MODIFY FILE
(NAME='templog', FILENAME='C:\Log\Tempdb_log\templog.ldf')
go

Note: “The file "tempdev" has been modified in the system catalog. The new path will be used the next time the database is started.” This message will be displayed after execution of the above mentioned statement.
We can restart the SQL Server either using “SQL Server Configuration Manager” or using commands in command prompt as shown below.

Use the command “ NET STOP MSSQL$<instance>” is the syntax to be used, to stop the server.
To start the server below shown command is used.
“NET START MSSQL$<instance>” is the syntax to be used, to start the server.

Open SQL Server Management Studio and open the “New Query” and check the paths of the tempdb data and log file information using below statements
USE TEMPDB
GO
SELECT * FROM SYS.SYSFILES
GO

Note: For Tempdb database there is no need of copying of “tempdb.mdf” and “templog.ldf” files from older location to newer location. “As the server starts every time the tempdb creates newly.”
MOVING MSDB DATABASE:
Here we can see the logical name and the file location of the msdb database.

Use the below mentioned command to change the default path for the MSDBData.mdf and MSDBLog.ldf files.
USE msdb
GO
ALTER DATABASE msdb MODIFY FILE
(NAME='MSDBData', FILENAME='C:\Data\MSDB_Data\MSDBData.mdf')
GO
ALTER DATABASE msdb MODIFY FILE
(NAME='MSDBLog', FILENAME='C:\Log\MSDB_log\MSDBLog.ldf')

Note: “The file "MSDBData" has been modified in the system catalog. The new path will be used the next time the database is started.” This message will be displayed after execution of the above mentioned statement.
Now we have to stop the SQL Server instance.
StartàAll ProgramsàMicrosoft SQL ServeràConfiguration toolsàSQL Server Configuration Manager
Change the location of the “MSDBData.mdf” and “MSDBLog.ldf” files to the specified locations and start the server.
Open Microsoft SQL Server Management Studio, open new Query and try the statements shown below:
USE MSDB
GO
SELECT * FROM SYS.SYSFILES
GO

Here you can see the file path, which is changed as shown in above screen.