BACKUPS AND RESTORATION
In SQL Server a copy of data that can be used to restore and recover the data after a failure of database is known as backup. A backup of SQL Server data is created at the level of a database or one or more of its files or filegroups. Table-level backups cannot be created.
ð All the backups information is stored in msdb database.
Types Of Backups Available In SQL Server :
There are 10 popular backups available they are
1) Full backup
2) Differential backup
3) Transactional log backup [T-log]
4) Copy only backup
5) Splitting backup
6) Mirrored backup
7) Compression backup
8) File or filegroup backup
9) Partial and
10) Differential partial backup
NOTE:
ð Copy only backup, mirrored backup, splitting backup are the new features added in sql server 2005.
ð Compression backup is a new feature of sql server 2008.
Before going to restoration of backups, we have to backup of database, let’s see how to take database backups in detail
· A full database backup backs up the whole database.
· This backup will take the data from the data file ie.., from mdf & ndf files.
· This includes part of the transaction log so that the full database can be recovered after a full database backup is restored.
· This is the base of the remaining backups ie.., differential & transactional log backups.
There are 2 ways in backups they are
1) By Using T-Sql Command :
USE MASTER
GO
BACKUP DATABASE <database name > TO DISK =’<path in which it is to be stored >’ WITH <property >
There are 7 different properties for all types of backups they are
1) INIT
2) NOINIT
3) UNLOAD
4) NOUNLOAD
5) FORMAT
6) NOFORMAT
7) STAT
1) INIT:
By using this INIT property we can replace the previous backup set in msdb that has been taken on the same database in same location.
2) NOINIT:
We can append or add the backup to the previous backup set in msdb in the same path by using NOINIT
3) UNLOAD:
By using this UNLOAD property we can replace the previous backup set in msdb hat has been taken in the same database in same location but it use when the backups are directly taken to tapes.
4) NOUNLOAD:
We can append or add the backup to the previous backup set in msdb in the same path by using NOUNLOAD
But it use when the backups are directly taken to tapes.
5) FORMAT:
By using this FORMAT property we can replace the previous backup set in msdb that has been taken in the same database in same location, but it use when the backups are directly taken by using backup media into them.
6) NOFORMAT:
We can append or add the backup to the previous backup set in msdb in the same path by using NOFORMAT
But it use when the backups are directly taken by using backup media into them.
8) STATS:
This gives the status about the backup process. While backup is running.
The following example shows how to create a full database backup for msdb database
Default full backup extinction is .bak
use master
go
backup database msdb to disk ='E:\backup\msdb.bak' with init

We can see that backup has processed successfully.
2) BY GUI METHOD:
We can create backups by using GUI method as shown
1) Expand Databases, and depending on the database, either select a user database or expand System Databases and select a database of your choice to which you want to take the backup.
2) Right-click the database, point to Tasks, and then click Back Up.

3) The Back Up Database dialog box appears.

4) In the Database list box, verify the database name. You can optionally select a different database from the list.
5) You can perform a database backup for any recovery model (FULL, BULK_LOGGED, or SIMPLE).
6) In the Backup type list box, select Full.
|
7) For Backup component, click Database, optionally we can choose file or filegroup backups.
8) Either accept the default backup set name suggested in the Name text box, or enter a different name for the backup set.
9) Optionally, in the Description text box, enter a description of the backup set.
10) Specify when the backup set will expire and can be overwritten without explicitly skipping verification of the expiration data:
- To have the backup set expire after a specific number of days, click After (the default option), and enter the number of days after set creation that the set will expire. A value of 0 days means that the backup set will never expire.
The default value is set in the Default backup media retention (in days) option of the Server Properties dialog box (Database Settings Page). To access this, right-click the server name in Object Explorer and select properties; then select the Database Settings page. As

11) To have the backup set expire on a specific date, click ON, and enter the date on which the set will expire.
12) Choose the type of backup destination by clicking Disk or Tape. To select the paths click Add. The selected paths are displayed in the Backup to list box.
13) To remove a backup destination, select it and click Remove. To view the contents of a backup destination, select it and click Contents.
14) To view or select the advanced options, click Options .

15) Select an Overwrite Media option, by clicking one of the following:
- Back up to the existing media set
For this option, click either Append to the existing backup set or overwrite all existing backup sets.
Optionally, select Check media set name and backup set expiration to cause the backup operation to verify the date and time at which the media set and backup set expire.
Optionally, enter a name in the Media set name text box. If no name is specified, a media set with a blank name is created. If you specify a media set name, the media (tape or disk) is checked to see whether the actual name matches the name you enter here.
- Back up to a new media set, and erase all existing backup sets
For this option, enter a name in the New media set name text box, and, optionally, describe the media set in the New media set description text box.
16) In the Reliability section, optionally check:
- Verify backup when finished.
- Perform checksum before writing to media, and, optionally, Continue on checksum error.
The options in the Transaction log section are inactive unless you are backing up a transaction log (as specified in the Backup type section of the General page).
|

17) SQL Server 2008 Enterprise edition and later supports backup compression, you can compress a backup by checking Compress backup, and you can prevent compression by checking Do not compress backup.

· A differential backup is based on the most recent, previous full data backup.
· A differential backup captures only the data that has changed/modified since that full backup.
· This backup will take the data from the data file ie.., from ndf files.
· The full backup upon which a differential backup is based is known as the base of the differential.
· Full backups, except for copy-only backups, can serve as the base for a series of differential backups, including database backups, partial backups, and file backups.
· The base backup for a file differential backup can be contained within a full backup, a file backup, or a partial backup.
When the Differential option is selected, you cannot create a copy-only backup.
|
There are two ways of taking differential backups they are
1) By Using T-Sql Command
BACKUP DATABASE <database name > TO DISK=’<path in which the backup has to be stored>’ WITH DIFFERENTIAL , <property>
For example
BACKUP DATABASE [god] TO DISK = N'D:\god.bak' WITH DIFFERENTIAL ,INIT

2) BY USING GUI METHOD:
This is same as the full backup, but small difference is we have to change the backup type to differential as shown

In differential it is not necessary to take compression because the differential backup is the backup of modified pages only, any way this up to your choice.
· Transactional log backup will backs up only log files.
· You must have created at least one full backup before you can create any log backups.
· It’s not possible to take T-LOG backup in simple recovery model.
· After that, the transaction log can be backed up at any time unless the log is already being backed up.
· It’s recommended to take frequent T-LOG backups .
there are two ways to take transactional log backup they are
1) BY USING T-SQL COMMAND:
BACKUP LOG <database name > TO DISK= ’<path>’ WITH NOINIT
for example
BACKUP LOG [god] TO DISK = N'D:\god.bak' WITH NOINIT
2) BY GUI METHOD:
This is same as the full backup, but small difference is we have to change the backup type to TRANSACTIONAL LOG as shown.

In transactional log backup it is not necessary to take compression because the transactional backup is the backup of log pages only.
1) A copy-only backup is a SQL Server backup that is independent of the sequence of conventional SQL Server backups.
2) This is also full backup but the difference is this backup will not disturb the backup LSN number of previous full backup.
3) Occasionally, it is useful to take a backup for a special purpose without affecting the overall backup and restore procedures for the database. Copy-only backups serve this purpose.
4) Copy-only full backups (all recovery models)
A copy-only backup cannot serve as a differential base or differential backup and does not affect the differential base.
5) Copy-only log backups (full recovery model and bulk-logged recovery model only)
A copy-only log backup preserves the existing log archive point and, therefore, does not affect the sequencing of regular log backups.
The transaction log is never truncated after a copy-only backup.
There are two ways to take transactional log backup they are
1) By Using T-Sql Command:
BACKUP DATABASE <database name> TO DISK= ‘<path>’ WITH COPY_ONLY
For example
BACKUP DATABASE TEST TO DISK='E:\backups\test.bak' WITH COPY_ONLY
2) BY USING GUI METHOD:
This is same as full backup but we have to choose copy only backup while performing backup.

1) Whenever the database is large to take backup in a single file it is preferred to take splitting backup.
2) This backup option will split the single backup file to number of small backup files.
3) This will reduce the burden to database engine and server as well.
4) This will improve the performance of the backup rather than taking as a single file.
The syntax is
BACKUP DATABASE <database name> TO DISK = ‘<path1>,
DISK = ‘<path2>,
DISK = ‘<path3>, …… WITH FORMAT
For example:
BACKUP DATABASE TEST
TO DISK='F:\backup1\TEST1.BAK',
DISK = 'F:\backup1\TEST2.BAK',
DISK = 'F:\backup1\TEST3.BAK'
WITH FORMAT

1) It is quite a common practice to create an exact copy of the backup and store it to several places to deal with any catastrophes which might affect the place where the database is stored.
2) Once a full backup is accomplished DBAs generally copy the database to another location in their network using a third party tools like ROBOCOPY or native DOS commands like XCOPY.
3) In SQL Server 2005 and later versions, there is a Mirror command that makes a copy of the database backup to different locations while taking the original backup. The maximum limit of additional locations that can be specified with MIRROR clause is 3.
4) If this command is being run for the first time, it is mandatory to use the WITH FORMAT clause; but for sub sequential runs it is not required. WITH FORMAT reinitializes the backup.
5) We use the compression backup only for full back up .
The syntax to create mirrored backup is
BACKUP DATABASE <database name> TO DISK = ‘<path1>’,
MIRROR TO DISK= ‘<PATH2>’
MIRROR TO DISK= '<path3>’
MIRROR TO DISK=’<path4>’ WITH FORMAT
For example
BACKUP DATABASE TEST TO DISK='E:\BACKUP\TEST1.BAK'
MIRROR TO DISK = 'E:\BACKUPS\TEST2.BAK'
MIRROR TO DISK = 'F:\TEST3.BAK'
WITH FORMAT

Split File Backup to Multiple Locations using Mirror:
Whenever we have large size databases to be backup we use Split File Backup to Multiple Locations using Mirror ie.., we can split the backup file to parts and we can store it in different paths.
The syntax is
BACK UP DATABASE <database> TO DISK = ‘path1’,
DISK = ‘path2’,
DISK = ‘path3’
MIRROR TO DISK = ‘PATH4’,
DISK = ‘path5’,
DISK = ‘PATH6’ WITH FORMAT
For example
BACKUP DATABASE TEST
TO DISK='F:\backup1\TEST1.BAK',
DISK = 'F:\backup1\TEST2.BAK',
DISK = 'F:\backup1\TEST3.BAK'
mirror TO DISK = 'F:\backup2\TEST1.BAK',
DISK = 'F:\backup2\TEST2.BAK',
DISK = 'F:\backup2\TEST3.BAK'
WITH FORMAT

Using with format is necessary.
1) This is the special feature provided in sql server 2008
2) This option provides us feasibility to compress the backup file.
3) In previous versions of sql server we are using third party tools to compress the backup files.
4) We use the compression backup only for full backup.
5) In previous versions of sql server we need to use third party tools for backup compression such as LIGHT SPEED backup tools developed by QUEST.
There are 2 ways in backups they are
1) By Using T-Sql Command:
BACKUP DATABASE <database name to be backed up> TO DISK =’<path in which it is to be stored >’ WITH COMPRESSION, WITH <property >
For example :
USE MASTER
GO
BACKUP DATABASE test TO DISK ='f:\backup1\test_compressed.bak' WITH COMPRESSION, WITH INIT

2) By using GUI method:
This is same as full backup but, we have to change the compression backup in set in set backup compression
As shown below
1) If the database is too large to have full backup and if we don’t have enough time to take the full backup of the database at that time we will take file or filegroup backup
2) By this backup option we can backup specific file\files or filegroup\filegroups in particular database.
3) But , the Table-level backups cannot be created.
There are 2 ways in backups they are
1) By Using T-Sql Command:
BACKUP DATABASE <database name> FILE = ‘<file logical name>’ TO DISK = ‘<path>’ WITH <property>
BACKUP DATABASE <database name> FILEGROUP = ‘<filegroup logical name>’ TO DISK = ‘<path>’ WITH <property>
For example:
BACKUP DATABASE test file = 'test' TO DISK ='f:\backup1\test_compressed.bak' WITH INIT

2) By using GUI method:
In backup component we have to choose the file or filegroup backup instead of database.
We can choose the part of the database to be backup ie,.. for example here I have chosen secondary filegroup [test_fg] as shown but you can even choose a single file also.

9) PARTIAL
1) A partial backup resembles a full database backup, but a partial backup does not contain all the filegroups.
2) Instead, a partial backup contains all the data in the primary filegroup, every read/write filegroup, and any optionally-specified read-only files.
3) Partial backups are useful whenever you want to exclude read-only filegroups.
4) A partial backup of a read-only database contains only the primary filegroup.
5) A partial backup can serve as the differential base for differential partial backups.
The syntax for partial backup
BACKUP DATABASE <database name> READ_WRITE_FILEGROUPS TO DISK = ‘<path>’ WITH <property>
For example:
BACKUP DATABASE test READ_WRITE_FILEGROUPS
TO DISK = 'f:\DatabaseForPartialBackups_PARTIAL_Full.bak'
GO

1) A differential partial backup records only the data extents that have changed in the filegroups since the previous partial backup.
Syntax for partial differential backup
BACKUP DATABASE <database name> READ_WRITE_FILEGROUPS TO DISK = ‘<path>’
WITH DIFFERENTAL, WITH <property>
For example:
BACKUP DATABASE test READ_WRITE_FILEGROUPS
TO DISK = 'f:\DatabaseForPartialBackups_PARTIAL_Diff.bak'
WITH DIFFERENTIAL
GO

RESTORATION
Restoration is nothing but recovering the data from the backups to the database. Whenever the databases is crash we have to restore the database or when we are performing DB refresh we have to restore the database backup from production server to other servers like test or development or quality analysis servers.
Depending on the data loss we have to restore the full or partial data. For example if complete database is down then we have to restore the complete database. After restoring the full database we have to restore the transaction log backup for point in time restoration. in other case when particular file or filegroup is down we have to restore particular file or filegroup.
SQL Server provides different was of restorations they are
1) Database
2) Transaction log files
3) File or filegroup
4) Piecemeal restoration
1) RESTORING DATABASES:
To restore database from full backup any subsequent differential backup, you can use the RESTORE DATABASE statement. In the restoring database statement we can restore data backups such as
Full backups and differential backups.
The properties of database restoration are
1) replace
2) norecovery
3) recovery
4) standby
5) stats
1) REPLACE:
The replace is the property we use to restore the full backups. This will replace the previous data in the database.
2) NORECOVERY:
This recovery statement will continue to restore in restore more backups in to the database. This will keep the database in recovery mode. the database is not accessible in his mode even the data cannot be seen.
3) RECOVERY:
WITH RECOVERY statement will specifies there are no more backups to be restored in to the database. After this statement the recovery process will be completed then the database will come to online. during the recovery the recovery process the UNDO and REDO operations will be executed. This will rollback and roll forward the transactions based on committed or uncommitted .
4) STANDBY:
This statement will keep the database in read only mode in this mode users can see the database and data again when we restore the database we have to kill all the connection on the database.
So we generally prefer the no recovery mode during restoration.
5) STATS:
This gives the status of the restoration process.
1) RESTORING FULL/DIFFERENTIAL BACKUP
we can restore the backups in to ways they are
1) BY USING T_SQL COMMAND:
The syntax for restoration of the full or differential backup is
USE MASTER
GO
RESTORE DATABSAE <database name > FROM DISK = ‘ <path>’ WITH <property>
For example
use master
go
restore database god from disk = 'e:\god.bak' with replace

2) BY USING GUI METHOD:
To restore database by gui method
Right click on the database to be restored tasks->restore->database.

When we choose the database option we can get following dialog box in this we can choose the the database into which restoration is to be done.

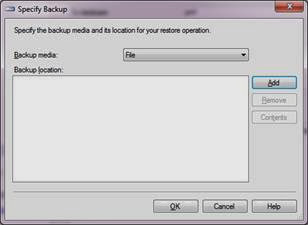
When we choose the from disk we can see the following popup window
Here we have to add the backup file from stored location by clicking on the add button.
We can see the below popup window. we have to choose the backup file from that file list and click on ok button.

We can see the below popup window . after completion of choosing the files click on ok button

We can see the chosen backup file as shown.

When we click on options we can see the below popup window. Here we can choose the options like replace , restricted users, recovery, no recovery, standby

After choosing appropriate options then click on ok button we can restore the database.
2) RESTORING THE FILE OR FILEGROUP:
Whenever we want to restore a part of database we can use file or filegroup restoration.
We can restore the file or filegroup in 2 ways they are
1) BY T_SQL COMMAND:
Syntax :
USE MASTER
GO
RESTORE DATABASE <database name> FILE/FILEGROUP = ‘ <logical name>’ FROM DISK = ‘<path>’ WITH <property>
For example:
RESTORE DATABASE new FILE = 'new', FILE = 'file' FROM DISK = 'E:\newfile.bak',with STATS = 10
GO
For filegroup restoration
RESTORE DATABASE new FILE = 'new', FILEGROUP = 'fileGROUP_FG1' FROM DISK = 'E:\newfilegroup.bak',with STATS = 10
GO
2) BY GUI METHOD:
This is same as database restoration but we have to choose the file and file group restoration at the beginning. As shown below
Right click on the database to be restored tasks->restore-> file and filegroups.

Remaining all is same as the database restoration.
3) TRANSACTION LOG RESTORATION:
For point in time restoration we have to restore the log backups
The transaction log files can be restored by using 2 ways
1) BY USING T-SQL COMMAND:
Syntax
USE MASTER
GO
RESTORE LOG FROM DISK = ‘< path >’ WITH <property>
Example
RESTORE LOG god FROM DISK = 'E:\backups\god.trn', STATS = 10
GO
2) BY GUI METHOD :
This is same as the database restoration but we have to choose the transaction log restoration at the beginning. As shown below
Right click on the database to be restored tasks->restore->database transaction log

Remaining process is same as the previous restorations.
4) PIECEMEAL RESTORATION OF DATABASES :
If the database has multiple filegroups, we can restore it by stages known as piecemeal restoration. This process begins with restoring the primary filegroup and further restores all secondary filegroups the remaining filegroups will be shown as offline. this method is useful when the data to be restored is too large and takes a lot of time to restore. This will help the users to use the data that is restored.
The first step is partial restoration sequence. when it is completed then the database is brought to online.
We can restore the piecemeal restoration by following steps
1) killing all the connections on the database.
2) perform partial restoration of primary and secondary filegroups by using following statements
for example we have primary filegroup , 2 secondary filegroups , 1 transaction log backup, 1 tail log backup
we can restore by following procedure
---RESTORING PRIMARY FILEGROUP
RESTORE DATABASE <database name> FILEGROUP =’ <PRIMARY>’ FROM DISK = ‘<path>’, WITH PARTIAL ,NORECOVERY
---RESTORING SECONDARY FILEGROUPS
RESTORE DATABASE <database name> FILEGROUP =’ <secondary_fg1>’ FROM DISK = ‘<path>’, WITH ,NORECOVERY
RESTORE DATABASE <database name> FILEGROUP =’ <secondary_fg2>’ FROM DISK = ‘<path>’, WITH ,NORECOVERY
----RESTORING LOG BACKUP
RESTORE LOG <database name> FROM DISK = ‘<path>’ WITH NORECOVERY
----RESTORING TAIL LOG BACKUP
RESTORE LOG <database name> FROM DISK = ‘<path>’ WITH RECOVERY
With recovery option will make the database to online completely.
Before going to restoration we have three ways to verify, get the information of the backup they are
1) headeronly
2) filelistonly
3) verifyonly
4) labelonly
The option header only gives the information about the backup by using the following command
The option header only gives the information about the backup by using the following command
RESTORE HEADERONLY FROM DISK = ‘<path>’
For example
restore headeronly from disk = 'E:\god.bak'

We can find the information about the list of files present in the backup, to which filegroup they belong ,size, their path by using the command.
RESTORE FILELISTONLY FROM DISK = ‘ <path>’
For example
restore filelistonly from disk = 'E:\god.bak'

To verify the backup is valid or not we have the following command
RESTORE VERIFYONLY FROM DISK = ‘ <path>’
For example
restore verifyonly from disk = 'E:\god.bak'

To view the mediaset and mediafamily information we have the following command:
RESTORE LABELONLY from disk = 'D:\Backups\sample181020151114.bak'

We can see the backup information by using backup set that is stored in msdb by using following syntax
RESTORE LABELONLY from disk = 'D:\Backups\sample181020151114.bak'

We can see the backup information by using backup set that is stored in msdb by using following syntax
USE MSDB
GO
SELECT * FROM BACKUPSET

No comments:
Post a Comment