MOVING SYSTEM DATABASES FROM ONE LOCATION TO ANOTHER LOCATION
MOVING MASTER DATABASE:-
StartàAll ProgramsàMicrosoft SQL ServeràConfiguration toolsàSQL Server Configuration Manager

Here select SQL Server Services, right click on SQL Server instance and select Properties.

In Properties go to Advanced.

In Startup Parameters select the content and copy that to a notepad as shown below:

Here data file is in “C:\SQL Server\MSSQL.1\MSSQL\DATA” and the log file is in “C:\SQL Server\MSSQL.1\MSSQL\DATA”

Make the changes in notepad where we want to store the data and log file of master.

Copy the changed paths to the startup Parameters. Click Apply button.

Below shown message will be displayed. Click Ok on warning as shown below. Click Ok on Properties window.

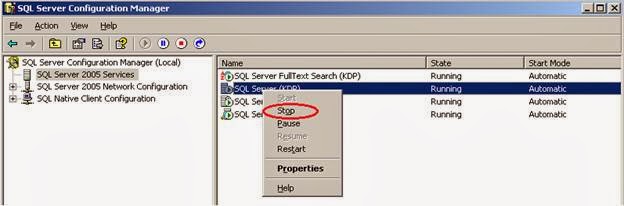
Stop the SQL Server instance.
Change the location of the master.mdf and mastlog.ldf files to the specified locations and start the server.

Open Microsoft SQL Server Management Studio, open new Query and try the statements shown below:
USE master
go
select * from sys.sysfiles
go

Here you can see the file path, which is changed as shown in above screen.
MOVING MODEL DATABASE:
In the below shown screen shot we can see the logical name for the model and the file path where it is stored.

With the help of alter command shown below we can change the path of the model database.
use model
go
ALTER DATABASE model MODIFY FILE
(NAME='modeldev', FILENAME='C:\Data\Model_data\model.mdf')
go
ALTER DATABASE model MODIFY FILE
(NAME ='modellog', FILENAME='C:\Log\Model_log\modellog.ldf')
go

Note: “The file "modeldev" has been modified in the system catalog. The new path will be used the next time the database is started.” This message will be displayed after execution of the above mentioned statement.
Now we have to stop the SQL Server instance.
StartàAll ProgramsàMicrosoft SQL ServeràConfiguration toolsàSQL Server Configuration Manager

Change the location of the “model.mdf” and “modellog.ldf” files to the specified locations and start the server.

Open Microsoft SQL Server Management Studio, open new Query and try the statements shown below:
USE model
go
select * from sys.sysfiles
go

Here you can see the file path, which is changed as shown in above screen.
MOVING TEMPDB DATABASE:
In the below shown screen shot we can see the logical name of the tempdb and the file path where it is stored.

Use the below mentioned command to change the default path for the tempdb.mdf and templog.ldf files.
use tempdb
go
ALTER DATABASE tempdb MODIFY FILE
(NAME='tempdev', FILENAME='C:\Data\Tempdb_data\tempdb.mdf')
go
ALTER DATABASE tempdb MODIFY FILE
(NAME='templog', FILENAME='C:\Log\Tempdb_log\templog.ldf')
go

Note: “The file "tempdev" has been modified in the system catalog. The new path will be used the next time the database is started.” This message will be displayed after execution of the above mentioned statement.
We can restart the SQL Server either using “SQL Server Configuration Manager” or using commands in command prompt as shown below.

Use the command “ NET STOP MSSQL$<instance>” is the syntax to be used, to stop the server.
To start the server below shown command is used.
“NET START MSSQL$<instance>” is the syntax to be used, to start the server.

Open SQL Server Management Studio and open the “New Query” and check the paths of the tempdb data and log file information using below statements
USE TEMPDB
GO
SELECT * FROM SYS.SYSFILES
GO

Note: For Tempdb database there is no need of copying of “tempdb.mdf” and “templog.ldf” files from older location to newer location. “As the server starts every time the tempdb creates newly.”
MOVING MSDB DATABASE:
Here we can see the logical name and the file location of the msdb database.

Use the below mentioned command to change the default path for the MSDBData.mdf and MSDBLog.ldf files.
USE msdb
GO
ALTER DATABASE msdb MODIFY FILE
(NAME='MSDBData', FILENAME='C:\Data\MSDB_Data\MSDBData.mdf')
GO
ALTER DATABASE msdb MODIFY FILE
(NAME='MSDBLog', FILENAME='C:\Log\MSDB_log\MSDBLog.ldf')

Note: “The file "MSDBData" has been modified in the system catalog. The new path will be used the next time the database is started.” This message will be displayed after execution of the above mentioned statement.
Now we have to stop the SQL Server instance.
StartàAll ProgramsàMicrosoft SQL ServeràConfiguration toolsàSQL Server Configuration Manager
Change the location of the “MSDBData.mdf” and “MSDBLog.ldf” files to the specified locations and start the server.
Open Microsoft SQL Server Management Studio, open new Query and try the statements shown below:
USE MSDB
GO
SELECT * FROM SYS.SYSFILES
GO

Here you can see the file path, which is changed as shown in above screen.


